
The Data Export Dashboard allows you to export your sales, orders, turnovers, and customers to your ERP or any other system your business uses for management and/or accounting purposes. You can select any number of combinations of values you need to export and save them as templates for further use. In order to do this, you have to log into the Delivety App as a user who has been assigned the Data Export Dashboard. Log into the Delivety App using the URL your-domain.delivety.com/app (replace your-domain with your Delivety domain name).
STEP 1. SELECTING PERIOD AND DATA SET
From the left pane, you can select a period to export the data for then the data set. Data sets are listed in the dropdown menu of values to export and some of them contain subsets. For example, the Sales data set contains Revenue, Daily Revenue, and Money Flow data sets, while the Turnovers data set contains turnovers of dishes, modifiers, services, SKUs, ingredients, and accessories. Each data set or subset contains checkboxes of parameters to export.
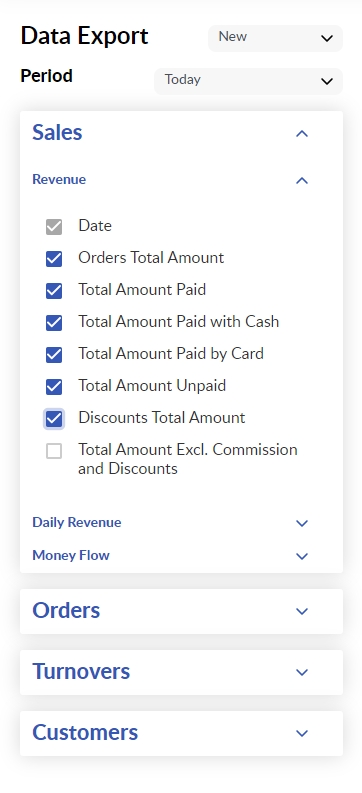
STEP 2. PREPARING THE SELECTED DATA SET TO EXPORT
Once you select the checkboxes of the parameters you need to export, they will appear on the right pane arranged in columns filled with the most recent data. You can see more data by clicking on the Load More button. This only affects the number of rows to display but not the actual export, as the data will be exported precisely within the selected period. Drag and drop the columns to rearrange them in the order suitable for the system you will import the data into. Save the template by clicking on the Save Template button if you wish to use this set of the parameter when you export in the future.

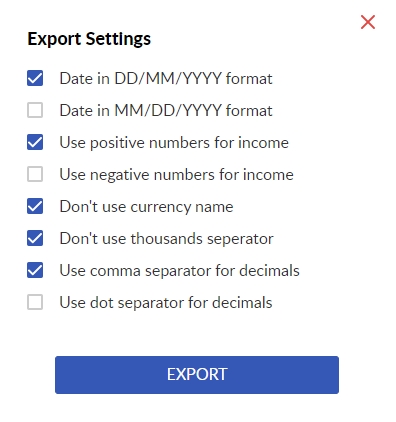
STEP 3. EXPORTING THE DATA SET
Press the Export button once the parameters are selected and arranged in the way acceptable by the system you will import the data into. You will be prompted to adjust the export settings to that system’s needs: change the date format, numbers and currency parameters, as well as separators for decimals. Click the Export button once you’re done with adjusting. The settings will be saved for the next time.
STEP 4 EXPORTING THE CUSTOMERS
You will need special permission to export your customers’ data. Log in to your Delivety Admin Panel, open the Users tab then click on the user you wish to allow to export the customers’ data. Scroll down to the Dashboards, then assign the Data Export Dashboard alongside if not assigned yet, then tap the Export Customers switch to turn it on. Once this user logs into Delivety App, the Customers tab data set will appear in the right pane.
_____________________________
Previous Step:
Monitoring Your Performance with Reports & Analytics Dashboard
Comments
0 comments
Please sign in to leave a comment.