
The Assembly Dashboard is a dashboard that you can choose to use if someone in the kitchen is responsible for putting the different parts of a customer's order together, checking it before it goes out, and giving it to the delivery person. This can be a dedicated order assembler, a kitchen chef, or a cook in charge of the shift. The order assembler has to log into the Delivety App using the URL your-domain.delivety.com/app (replace your-domain with your Delivety domain name).
To use the Assembly Dashboard, you must give permission to the user to access it. However, if your food ordering system doesn't involve anyone putting the orders together, then you don't need to assign the Assembly Dashboard to anyone. In this case, this stage of the process won't be used.
💡 You can choose to temporarily skip the entire process of assembling an order by selecting the appropriate option from the Automation features available in the Admin Panel.
STEP 1. ASSEMBLY DASHBOARD OVERVIEW
If the Assembly Dashboard is not your main dashboard, you can switch to it by selecting it from the navigation panel on the left. If it is your main dashboard, it will open automatically and you will see the orders on the left-hand side of the screen, arranged in order of urgency with the most urgent orders at the top. Assembled (Ready) orders will move to the bottom of the screen. You can view the contents of an order by selecting it, which will open up on the right-hand side of the screen.
STEP 2. SETTING UP THE “PLANNED” TIME FOR NEW ORDERS
When a new order is received, it will appear in the Assembly Dashboard with the "New" status. The order assembler must provide a Planned time to the operator based on how busy the kitchen is and how long it will take to prepare the order. The Planned time tells the operator when the order will be ready, so they can tell the customer how long it will take and confirm the order if the customer agrees. To set the Planned time, you need to select the new order. The order will get the "Confirmed" status once the operator confirms it with the customer, and the "Dispatch by" time will be finalized. A countdown timer to dispatch will appear, along with the quantities of the ordered, prepared, and assembled dishes.
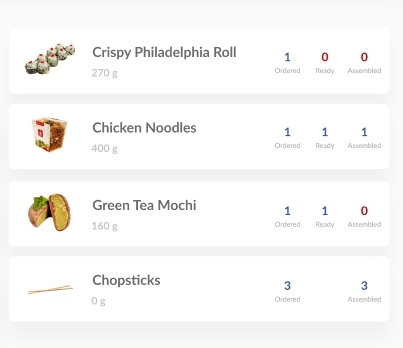
STEP 3. ASSEMBLING THE ORDER
After the first dish of an order has been prepared, the order card will switch to assembly mode, which will show how many dishes are in the order, how many of them are already prepared by the kitchen, and how many of them have been assembled. This allows you to assemble multiple orders at the same time as the kitchen prepares the dishes. When you click on the order card, the list of dishes for that order will open on the right. You will need to click on the dishes that you have placed in the order's bag(s) or box(es) as assembled items. A dish calculator will appear so you can set the quantity of the assembled items. The information in the order cards will update automatically. Additionally, there may be some items that are not prepared by the kitchen (such as disposable cutlery, chopsticks, paper bags, etc.), and these items will be marked as "ready to assemble" from the start.
STEP 4. PRINTING ORDER’S RECEIPT
Once you have finished assembling the order, it will receive the "Assembled" status, and the "Receipt" button at the top of the screen will become active. You can press this button to print the receipt for the order. The button will only become active if all the items have been assembled, which helps to prevent forgetting any items and ensures that only fully assembled orders are dispatched. After printing the receipt, you can staple it to the order bag and give it to the delivery person.
_____________________________
Next Step:
Dispatching, Delivering, Closing, and Canceling the Orders
Previous Step:
Preparing the dishes using the Kitchen Dashboard
👉 Learn more:
------------------------
💡 How to create Assembly Dashboard users and distribute kitchen workflows:
💡 How to create Kitchen Dashboard users and distribute kitchen workflows:
💡 How to accept food delivery orders over the phone using the Delivety Operator Dashboard:
Comments
0 comments
Please sign in to leave a comment.