
The Operator Dashboard is the visual interface where the operator creates orders manually and/or receives them from a website (or any other integrated channel) then manages them in real time in a convenient and effective way.
In order to use the Operator Dashboard, you have to log into the Delivety App as a user who has the Operator Dashboard assigned. Log in to the Delivety App using the URL your-domain.delivety.com/app (replace your-domain with your Delivety domain name).
Recommended Devices
The Operator Dashboard can be used on any PC, Mac, iPad or Android tablet as well as on any iPhone or Android phone. If phone communication with customers is essential for your business, then we would recommend using a tablet or a phone (and yes, your operators can use their own phones to launch the Operator Dashboard!). That’s because the Operator Dashboard comes complete with integrated call functionality so that your operators can call customers or couriers anytime with just one click. If the operators do not converse over the phone much, or you would prefer to continue using your existing phone system (PBX or VoIP), however, then a PC or Mac with a widescreen monitor would be much better. In this case, your operators will be able to see up to 25 orders simultaneously. A standard monitor is quite enough for this, and it doesn’t even require touch-screen functionality.
User Interface Overview
The Operator Dashboard consists of four interface elements: Toolbar, QuickStats Bar, Order Cards Area and Order Editor.
The Toolbar is similar to the toolbars of other Delivety Dashboards and consists of the following elements:
The Time & Date Selector allows you to select any date to view and manage orders. For instance, you can switch to tomorrow's date to view and manage orders that your customers have placed for tomorrow. By default, it shows the current time and date when you log in.
The Search Bar allows you to search for orders either by the order’s number or status, the customer’s phone number, customer name, customer address, the time the order is placed or set to deliver by, or even the courier’s name or the location where the order has to be prepared and dispatched from. The search results appear on the fly once you start typing in the Search Bar.
The View Toggle button allows you to switch the Orders Area between cards view and table view.
The Create Order button opens a blank order form in the Order Editor so you can start inputting the order manually.
The Full-Screen mode button opens the Operator Dashboard in the full-screen mode so you will be able to see more orders in the Order Cards Area.
The Avatar button opens the dashboard selector that allows you to switch between the dashboards if you have multiple dashboards assigned.
The Stop List button opens the list of dishes that are temporarily hidden from the menu. The dishes can be placed on the Stop List, for instance, if your kitchen ran out of some ingredients.
The Exit button logs your user out of the Delivety dashboard.
The QuickStats Bar / Orders Filter shows brief statistics data for today and consists of the following elements:
Orders count for today so far
New orders that need your attention to confirm them with customers
Ready orders that are prepared and assembled, but not yet dispatched
Delivering orders that the couriers are currently delivering
Unpaid orders that have not been paid by the customers yet
Canceled orders that have been canceled
Late orders that are either missed “Agreed Planned Time” or delivered late
Total is the amount of money already paid for the orders for today so far both in cash and by card
Discounts is the total amount of money discounted for today so far
Cash is the amount of money paid for the orders in cash
Card is the amount of money paid for the orders by card
Couriers is the number of couriers that are involved in delivery today so far
The Orders Area shows today’s orders in a form of cards (or in a table view) with brief information about each order:
Orders Area:
Cards View:
Table View:
Each card or a table row provides the order info that is relevant to its current status. For instance, the Preparing order card shows the following information:
The Order Editor opens once you click on an order and it consists of three columns
The first column is the Order Properties where you can see and change:
- the order and customer details:
- the delivery details:
- current status of the order:
The Order Status Bar shows the "order journey" with timestamps for each status change alongside the time elapsed between status changes:
The second column is the Order itself where you can add and remove dishes...
...and configure the discounts and payment options:
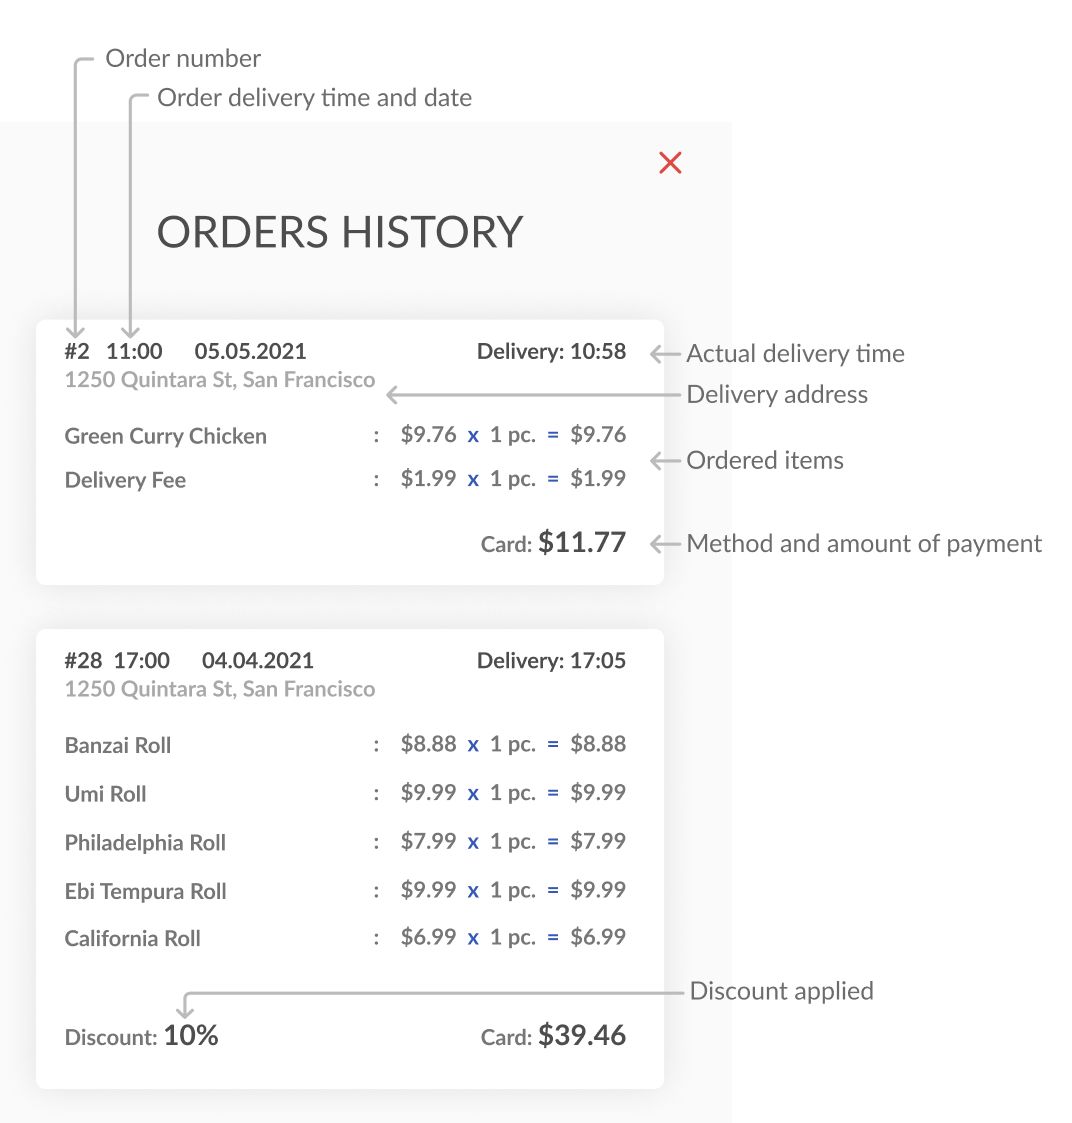
The third column is the Order History where you can see the customer’s previous orders:
Accepting Your First Orders
STEP 1. OPERATOR DASHBOARD OVERVIEW
Switch to the Operator Dashboard by clicking on the avatar icon in the top-right corner of the screen if the Operator Dashboard isn’t your main dashboard. There you will see the orders arranged by urgency: more urgent ones are showing up at the top of the screen, while less urgent ones are below them. Delivered orders move to the bottom of the screen.
STEP 2. ADD COURIERS.
Click on the QuickStats tab and select Couriers and add at least one courier.
Click on the plus icon to add a courier. You can also add couriers’ phone numbers to call them directly from the Operator Dashboard if needed.
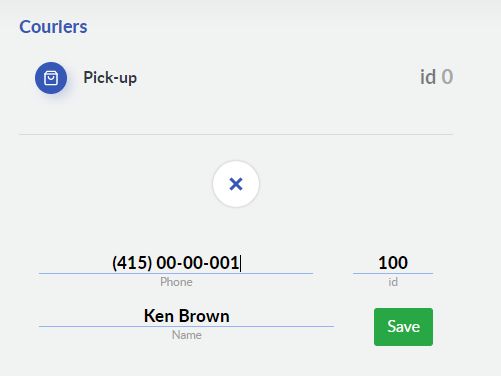
Also, there is the default Pick-up option for the orders that have to be picked up by customers from the location (the kitchen that the order is assigned to).
STEP 3. CREATE A NEW ORDER MANUALLY
Go back to the Operator to click the Create Order button in the toolbar of the Operator Dashboard. The New Order interface opens so you can start entering the order data.
STEP 4. ADD CUSTOMER DATA
Fill in the phone number, name and email of the customer. Later, when that customer orders again, all the data will fill in automatically once you enter the customer’s phone number. All the data, except the phone number, is optional. It's important to press the OK button to save the data.
STEP 5. SET DELIVERY TIME AND DATE
Type in the delivery address and select the time the order has to be delivered to the customer. The date is set to today automatically, however you can change it if needed.
STEP 6. ASSIGN COURIER AND LOCATION
Assign a courier who will deliver this order. See Step 1 If you need to add more couriers You assign a courier later if you wish. Assign the location of the kitchen where the order will be dispatched from. You can skip this step if you only have one location or do this later from the Operator Dashboard using the drag-and-drop function.
STEP 7. ADD DISHES TO THE ORDER
Click on the Add button in the ORDER tab and select the dishes and adjust their quantity with the plus and minus buttons. Add dish modifiers if needed. Also, you can switch between domains by clicking on the appropriate logo icons if needed. Once you’re done adding the dishes, click the plus button again to set the method of payment and other parameters.
STEP 8. SET METHOD OF PAYMENT, ADD DISCOUNT, AND SET “CHANGE FOR” VALUE
You can switch between cash and card method (if the customer pays by card on delivery), add a discount, and set the amount the courier has to give change for.
STEP 9. WAIT FOR KITCHEN TO PROVIDE A TIME ESTIMATE (PLANNED TIME) FOR THE ORDER
The order will appear both in the Kitchen Dashboards of the appropriate cooks and the Assembly Dashboard. This allows the kitchen staff to evaluate the time needed to prepare the order. Based on this estimation, the Assembly Dashboard user enters the Planned time for this order which is immediately shown in the Operator Dashboard as the Planned dispatch time.
STEP 10. CONFIRM THE ORDER TO THE CUSTOMER
Once Planned dispatch time is received from the kitchen, the operator can provide the estimated delivery time to the customer, based on the current couriers’ workload. The Operator calls the customer (if needed) to confirm the order and fills in the Confirmed dispatch time and corrects the Delivery time if needed. These actions switch the order to the Confirmed status. The kitchen staff sees in their Dashboards that the order is confirmed now and starts preparing it.
STEP 11. DISPATCHING THE ORDERS
You can dispatch the order once it gets the Assembled status and has a courier assigned. In order to dispatch the order, click on the order card in the Operator Dashboard and tap the Dispatched switch. The dispatched time will be also recorded for further reports and analytics.
STEP 12. DELIVERING THE ORDERS
Once the order is delivered, you have to tap the Delivered switch to tell the system that the order has been delivered and can be closed now. The delivered time will be also recorded for further reports and analytics.
STEP 13. CLOSING THE ORDERS
Tap the Paid switch once the order is paid. Kindly note that the Paid switch might be already switched on if the order has been paid by card via your ordering website.
Your next step is to finalize the order by tapping the Finalized switch. No changes can be made to the order after that point.
Alternatively, you can set your orders to be finalised and closed automatically once they are both delivered and paid, You can find this option in the Preferences tab of your Admin Panel > Settings.
You can also cancel the order at any stage (before it’s Paid or Delivered) by tapping the Canceled switch. Also, you can leave a note describing the reason for its cancellation.
Understanding the Order Statuses
Here at Delivety, we use the following Order Statuses to describe the current stage of each order journey:
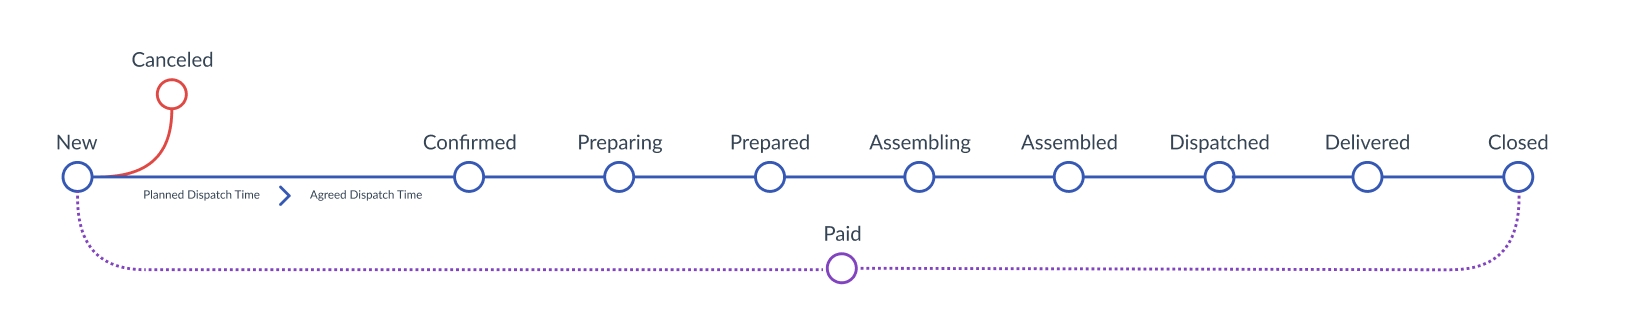
The New status shows that the order has been just received and awaits the Planned Dispatch Time time from the kitchen (if the necessity of the Planned time is not disabled in the Admin Panel).
The order gets the Confirmed status once both the kitchen enters the Planned Dispatch Time time and the operator fills in the Agreed Delivery Time confirmed with the customer. In other words, the order is ready to be prepared now.
The order gets the Preparing status once the kitchen has prepared at least one dish of the order.
The order gets the Prepared status once the kitchen has prepared all the order dishes.
The order gets the Assembling status once the order assembler has assembled at least one dish of the order.
The order gets the Assembled status once the order assembler has assembled all the order dishes. In other words, the order is ready to dispatch now.
The order gets the Dispatched status once the courier gets the order to deliver it to the customer. In other words, the order is delivering now.
The order gets the Delivered status once the customer receives the order.
The order gets the Canceled status once the operator cancels it by tapping the canceled switch.
The additional statuses (like Paid/Unpaid and Closed) show extra states of the order:
The Unpaid status shows that the order is yet to be paid.
The Paid status shows that the order is paid in full.
The order gets Closed status automatically (if it’s not disabled in Admin Panel settings) once the order is both Paid and Delivered. No further changes can be made to the order once it gets the Closed status.
Frequently Asked Questions
How to change the order status
How to get the Planned Dispatch Time from the kitchen
How to assign the new order to a courier
How to add couriers to the list of available couriers
How to assign an order to the appropriate location
How to switch the order payment method from Cash to Card and vice versa
How to change the order status to Paid
How to change the order status to Delivered
How to add dishes to the order or to remove them
How to apply a discount to the order
How to leave a note for the kitchen
How to set the "Change for" amount for the order
How to read the order status bar
How to view the customer’s Orders History
How the orders are arranged in the Operator Dashboard
How to add dishes to the Stop List
How to view the other date orders
How to read the QuickStats values
Comments
0 comments
Please sign in to leave a comment.